|
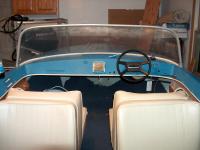
Windshield shows crazing and discoloration of the plexiglass.
|
Windshield Repair
Many of the 1960’s MFG boats came with Plexiglas windshields made by Taylor Made that have suffered from age. The spider cracks, crazing, and yellowing cannot be removed. The only solution is to replace the windshield.
Some of the windshields are available from Taylor Made and include new aluminum frame and deck gasket, but there is an eight week lead time and about $300 plus shipping.
I decided to take a chance and replace the aging Plexiglas in the aluminum frame with Lexan (polycarbonate) because it is rather cheap and easy to bend without heat in thin sheets. I bought a 30" x 96" x 1/8" piece of Lexan from the local supplier of plastics (found one in the yellow pages under 'plastics suppliers'). It was $77.00 for that piece. It was actually much longer and more expensive than I needed. Wait until after the template is made to order the Lexan because it is priced by the square foot.
This windshield repair project will not exactly duplicate the original Plexiglas windshield shape exactly because the original windshield has a slight “bubble” shape (curved in two directions) and the Lexan windshield will be flat, being curved from left to right, but not from top to bottom. The challenge is making a flat template from a concave windshield. This is covered in detail later.
|
|
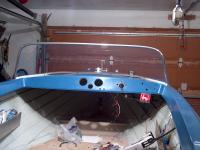
Step 1: Removing the Windshield.
Remove the windshield from the boat by removing the nuts from the bolts that protrude through the underside of the deck. Be very careful not to break or lose the hardware that mounts the windshield. Carefully remove the rubber gasket and clean it, as it will be re-used during re-assembly. It will most likely be stiff so try not to bend it or it may crack. This gasket is available new from Taylor Made.
|
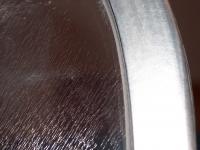
Closeup of Crazing
|
|
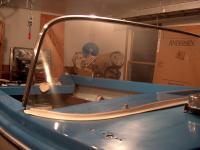
New Polycarbonate Installed
|
Step 2: Separate the Windshield from Frame
Remove the thin weather seal rubber strip from the outer side of the frame. Remove the aluminum frame from the Plexiglas by driving it off with a block of wood and a hammer, working from the backside of the windshield while an assistant prevents it from moving around on the workbench. Lay the block of wood on the Plexiglas and up against the aluminum frame and strike with the hammer. Do not pry with a screwdriver because the aluminum will bend. Drill out the rivets that hold the deck mounting bolts to the windshield. Save these special bolts for re-use later.
The Plexiglas is held in by some C clips internal to the frame that grip holes drilled in the perimeter. It takes some work and patience, but it can come off without breaking the Plexiglas. If the windshield does break, just tape it back together using packing tape or the like.
Now is a good time to polish and straighten the frame if it is bent. Use coarse steel wool to remove all weather marks, scratches, etc leaving a dull and uniform finish. Follow with medium and fine steel wool until it has a bright satin look. Application of automotive Rubbing and Polishing compounds bring it up to a highly reflective finish. Apply wax. Don’t forget to polish the triangle shaped corner pieces of the frame to match.
|
|
Step 3: Make Template of Windshield
Use heavy poster board and make a template of the windshield from the inside, being careful NOT to allow the poster board to sag into the top to bottom curve of the windshield. (Only let the poster board touch the perimeter of the windshield). Place a piece of tape on the frame top center. Make an alignment mark on the tape extending onto the template. This mark will be used for assembly. Label the top and bottom of the template, and left and right. Trace the windshield perimeter on to the poster board and then cut out the template. Be sure to cut the template exactly on the trace lines so that the template is not cut larger then it really should be.
|
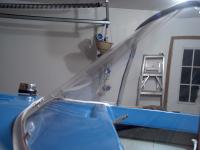
New Windshield is flat, not bowed like original
|
|
View from rear
|
Step 4: Cut the new Windshield
Trace the template onto the flat sheet of polycarbonate and transfer the alignment mark from Step 3. Cut out windshield using a saber saw on low speed with a wood scrolling blade. It cuts easy, no chips and no cracking. It helps to have an assistant support the lexan well so it does not vibrate or chatter while being cut. Again, be sure to cut on or inside the trace lines so the new windshield is the same size as the old.
|
|
Step 5: Install the Windshield.
The new windshield is then fit into the old frame. Be sure to line up the alignment marks on the frame with the windshield made in Steps 3 & 4, or the corners will not fit well, and the windshield may be off center in the frame. Fitting the windshield into the frame is made easier if done by working on the floor. The Polycarbonate is thin and very flexible, so don’t worry about it breaking or cracking while bending it into the curves of the windshield. It will need to be force fit into the frame, but will stay in place if not man handled too much. Test fit the assembly onto the boat. The leading edge of the front side will have to be pressed down to the deck to secure with nuts/bolts to the original fasteners. Re-use the original rubber seal if not damaged, or buy a new one. After you are satisfied the windshield is in the frame correctly, drill about 7 to 9 holes around the inside of the frame that pass through the windshield. Secure the windshield in place with stainless steel sheet metal screws through these holes. Be careful to not drill through the frame to the front side where the holes will be visible. Use short screws, about ½ inch.
Drill holes in bottom of windshield matching the location of the old bolt holes in the deck and remount the old deck bolts to the windshield using new stainless nuts, bolts and washers.
Attach new windshield assembly to boat. Peal off the protective plastic covering on the polycarbonate and wax the windshield. You are done.
This project can be done in one afternoon in just a few hours. The results are fantastic. And the price is right too.
|
Frame needs more polishing
|
|